Help and FAQ

Windows:
Check Software Centre for software package.
There are a number of software packages licensed for UBC devices which can be self-installed using Software Center.
Software Center | UBC Information Technology
https://it.ubc.ca/sites/ubcit.ubc.ca/files/Software_Center-Software_Installations.pdf
Make me admin:
If you download a software installer from OntheHub or another source then you will need to grant yourself temporary administrator rights using Make Me Admin before you can run it
If the Make Me Admin (MMA) options remain greyed out and show that you are not authorized to use the application, there are some common fixes:
- Are you logged in with a CWL.stu account?
- Make Me Admin only works for CWL accounts with a valid Workday Worker appointment. Make sure you log in with just your CWL and drop the .stu.
- If you only have a CWL.stu account you will need to be sponsored for a guest account by your PI or manager.
How to Sponsor a Guest | UBC Information Technology
- Working onsite but connected to UBCvisitor Wifi. Connect to UBCSecure with your CWL and password or connect with a wired ethernet cable if available.
- Working remotely but not connected to the VPN. To resolve this follow these steps:
1. Reboot your computer
2. Connect to VPN prior to logging in to the computer – Instructions to connect to VPN can be found here
3. Login normally
After about 5 minutes, you should be able to use the Make Me Admin tool once again. If you run into any issues, please submit a ticket.
For additional information on using MakeMeAdmin, please refer here
There are a limited number of loaner desktops and laptops available to researchers who have made a purchase of new workstation through Research computing and are waiting on delivery of the equipment.
Loaners are also available if your UBC asset is in need of troubleshooting or repair.
Try these steps first:
-
- Using Cisco Secure Client, switch your VPN to myvpn.ok.ubc.ca
- Your username will be cwlusername.ubco.VPNGroup@app and you will enter your CWL Password
- Accept the notification from Duo on your phone.
- Use Remote Desktop app, or SSH, or X2Go to connect to the remote host.
If you need additional guidance continue reading below:
Prerequisites:
- Cisco Secure Client: This comes pre-installed on any UBC imaged machine. If you need to install this on your own device, additional instruction can be found at the link below.
- Log into https://myvpn.ubc.ca and download the client and install it.
- Additional instructions found here:
- Duo MultiFactor Authentication: Remote Lab access requires additional security, so you will have to have enrolled your cellphone with Duo, and installed the application on your phone.
- https://mfadevices.id.ubc.ca
- Additional instructions found here:
After you have installed the client software, and enrolled in Duo, the steps are as follows:
-
- Connect to the VPN.
- Accept the authentication request on Duo on your phone.
- Use the appropriate program to connect to the remote device.
1. Connect to the VPN:
For Windows and Mac, you will find Cisco Secure Client in your menus, or perhaps in the systray beside your clock. Opening it up will give you a box much like the following:
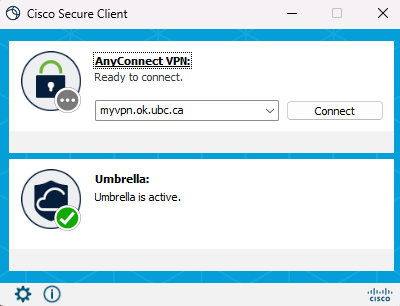
By default, it will likely read myvpn2.ubc.ca, be sure to change this to myvpn.ok.ubc.ca.
Once you hit Connect, you will be prompted to enter a username and password:

Your username, as above, will be comprised of your CWL Username, a period and then ubco, another period, and then the private network identifier that has been provided to you for your specific network. This is the ONLY place where you will need to use this format to authenticate.
Type in your CWL password and hit okay.
2. Duo: Accept connection request on your phone
The @app portion of the authentication above, will trigger a notification to Duo on your phone. Please note that @phone is also an option that will call you to verify.
You will need to accept the notification on your phone before the connection will complete successfully.
3. Use the appropriate remote access program
Windows
For the majority of people, you are going to be using Microsoft Remote Desktop to access Windows based resources on campus. All MS Windows installs come with Microsoft Remote Desktop installed. You will find this in your Start/Windows Menu.

MAc os
For MacOS users, you will need to go to the Apple Store and download the Microsoft Remote Desktop application, found here:
https://apps.apple.com/us/app/microsoft-remote-desktop/id1295203466?mt=12
Linux
For Linux users, there are more than a few options, Remmina tends to be packaged for most distributions, just when making the connection, be aware that it allows for both VNC and RDP, and you will want to choose RDP.
Launching the RDP Client will get you a window like this:
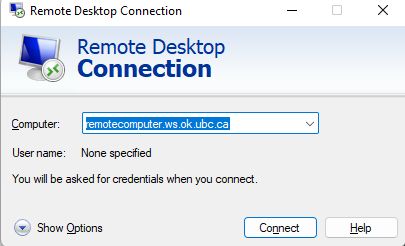
The computer name should have been given to you either by Research Computing, or your Prof/PI/Lab colleague.
When you hit connect, you will be prompted to enter a username and password. You may need to click the link that says More choices to be able to enter different information that your currently logged in user.
Username format: EAD\CWLUsername
And your CWL password.
Linux – SSH and X2Go
For connecting to a Linux machine, you have two choices. You can you SSH, which will get you a CLI – command line experience, or you can use X2Go which will get you a more fully feature GUI – graphical interface to work in.
For SSH with a Windows Client we suggest the following programs:
For Putty you will get a window like the following, where you place the machine name that was given to you in the Host Name box:
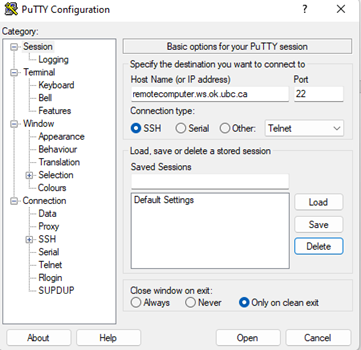
Your username and password will be your CWLUsername and password.
For MobaXterm you will want to press the new Session button and choose SSH:
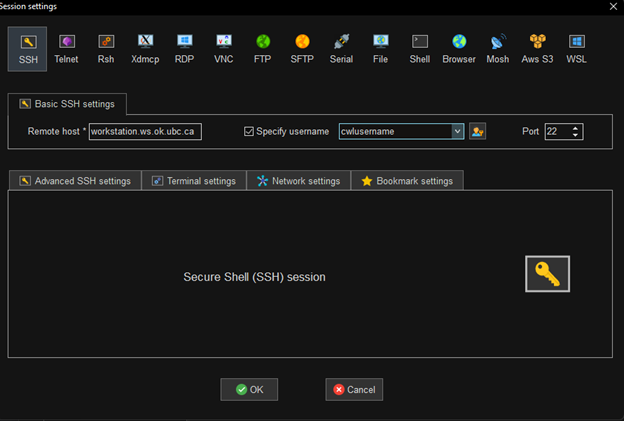
Enter the remote hostname and your CWLUsername.
For MacOS (or Linux), you can simply run Terminal on your machine for a command line experience, and use the following to connect:
ssh cwlusername@workstation.ws.ok.ubc.ca
This will prompt you to accept the SSH key, and then to provide your CWL password.
X2Go
X2Go is an X server/GUI for connecting to a Linux system, you can download the client here
MacOS users will also have to download xquartz from here
When you launch X2Go, click the New Session button in the top left and fill the form out as follows:

Session Name: can be whatever you want.
Host: hostname given to you for the remote host
Login: CWLUsername
Session Type: MATE
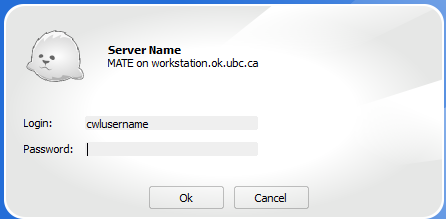
Click Okay, and you will see the new session in the top right, click where it says Server Name and enter your CWL password.

It didn’t work/I still can’t connect:
The most common problems with remote connectivity are:
- Not changing Cisco Secure Client to myvpn.ok.ubc.ca
- Forgetting to accept the Duo notification (or having accidentally silenced the application on your phone)
- Connecting to VPN with regular CWL username instead of cwlusername.ubco.vpngroup@app
- Powering off computers at the University
- New user – no permission:
- Research Computing needs to know of new users to be added to systems. These requests should come from your Prof/PI in the form of a ticket through ServiceNow. Access to these networks is granted on a VPN level, a Remote Desktop user group, and also SSH access level.